Would You Like an Ear of Cauliflower?
AURICULAR HEMATOMA DRAINAGE
Written by: Luke Fey, MD. Edited by: Sunny Elagandhala.
*** Skip to Step 1 if you want the down and dirty version ***
Introduction

Auricular hematoma describes a collection of blood within the cartilaginous matrix that makes up the outer ear or auricle. Typically, this condition results from a direct blow to the head during cage wrestling matches or physical altercations [1]. This collection warrants prompt drainage to prevent the unsightly complication of CAULIFLOWER EAR [2] and should be within the scope of any Emergency Physician worth their salt.
Before we attempt to drain this bad boy, let’s get familiar with the anatomy of the ear. Figure 1 depicts the important anatomical structures of the outer ear. It is important to remember that the ear lobe is NOT made up of cartilage. Most auricular hematomas are fluctuant, tender and located in the scaphoid fossa.
Figure 1.
Following a direct blow to the ear, blood builds up between the perichondrium and cartilage of the ear. Remember from medical school that the perichondrium is the outermost layer of cartilage and is responsible for its limited but essential blood supply. When the cartilage is separated from the perichondrium (by the hematoma) it will necrose and reform in a disorganized fashion resulting in the Mike Tyson Special EAR OF CAULIFLOWER.
Now we are ready to drain this thing. Have you ever done this before? I hadn’t so I had to YouTube it real quick. Here I offer the few essential steps needed for successful auricular hematoma drainage.

Step 1: Supplies
You don't need much to perform this procedure. Here is a quick list and picture.
Laceration kit
Lidocaine 1-2%
5.0 absorbable suture or 4.0 nylon suture
Xeroform
18-gauge needle and/or #11 scalpel
Step 2: Anesthesia
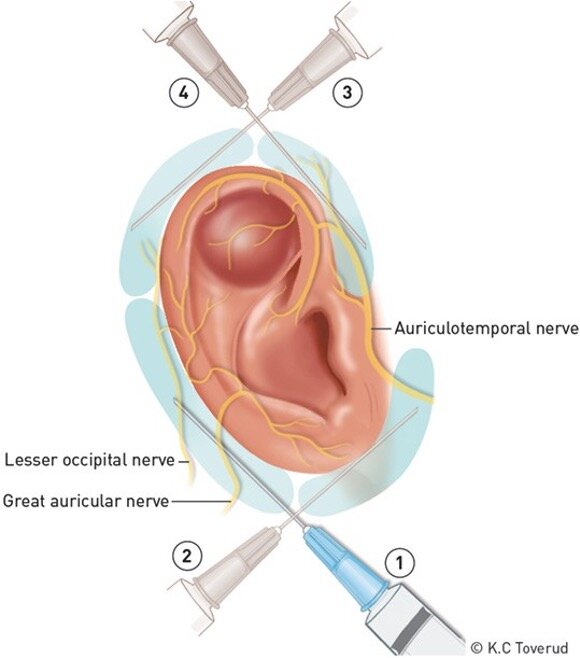
This is the step where you actually have to know what you are doing. The best way to completely anesthetize the e guy ar is with a ring-block of sorts.What I mean by this is that you will be administering lidocaine in the shape of a ring around the cartilaginous structure of the outer ear. You accomplish this with just two needle sticks while simultaneously anesthetizing 4 areas of interest. Figure 3 depicts exactly where and what nerves you will be numbing up.
Figure 3.
CLINICAL PEARL: Don’t be afraid to insert the needle to about 4 cm in each direction. This will ensure adequate analgesia. If you have not achieved full local anesthesia, you can add additional lidocaine in the following locations
Posterior-middle portion to the helix
Anterior to the tragus
Step 3: Incision and Drainage OR Needle Aspiration [4]
The size of the auricular hematoma will determine your approach:
<2 cm can be successfully drained with NEEDLE ASPIRATION
>2 cm should be drained with INCISION & DRAINAGE
Needle Aspiration
Sterilize field
Insert needle at area of greatest fluctuance
Aspirate blood until unable to do so
Remove needle and hold pressure for 5 minutes
Incision & Drainage
Sterilize field
Make a 1-2 cm incision along the base (most inferior portion) of the hematoma keeping in mind the cosmetic appearance of the scar
Milk hematoma and evacuate as much blood/clot as possible (this may take a while)
Use hemostat to explore and evacuate clots within the hematoma pocket
Irrigate hematoma pocket with saline
Approximate skin with dissolvable sutures OR
Use horizontal mattress suture through and through the cartilage and Xeroform to apply a compressive dressing (challenging to do properly)
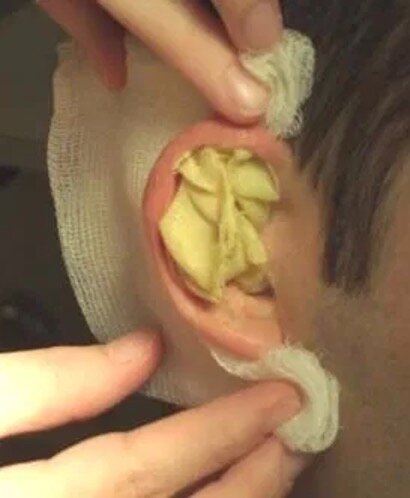
Step 4: Ear Bolster
This step is critical in preventing HEMATOMA REACCUMULATION. What you want to do is mold Xeroform within the contours of the auricle. This includes the anterior scaphoid fossa and concha as well as the posterior aspect of the auricle behind the helix (Figure 4). Support this Xeroform mold with gauze as needed to form a compressive bolster for the ear. Then wrap this entire entity with Kerlix around the whole head.
SPECIAL CONSIDERATIONS
Auricular hematomas should be drained in the ED if the patient presents within 7 days of its inception. After this time period, they should be referred to ENT for proper management.
All patients should be referred to ENT as soon as possible after ED drainage. Even with proper technique, hematoma reaccumulation can happen and ENT doctors know how to treat this complication.
TRICKS of the TRADE
Use an oral gauze roll from your dental colleagues to place behind the ear.
Fibrin Glue: one small case series [3] evaluated a novel technique of applying fibrin glue after hematoma evacuation. In this series of 5 patients (2 recurrent, and 3 delayed), 100% of patients did not have reaccumulation and were satisfied with the cosmetic results.
Consider using absorbable sutures to close the incision if you cannot achieve hemostasis after the procedure
CLOSING REMARKS
This procedure is not encountered frequently by your average Emergency Physician. I performed one of these for the first time in my 3rd year of residency and I was inspired to spread the knowledge I have acquired in doing so. I hope this quick review comes in handy if you ever happen upon a patient who just flew a little too close to the sun; the sun being Mike Tyson.

References
Patel BC, Skidmore K, Hutchison J, Hatcher JD. Cauliflower Ear. In: StatPearls. Treasure Island (FL): StatPearls Publishing; August 13, 2020.
Greywoode, J. D., Pribitkin, E. A., & Krein, H. (2010). Management of auricular hematoma and the cauliflower ear. Facial Plastic Surgery, 26(06), 451-455.
Mohamad, S. H., Barnes, M., Jones, S., & Mahendran, S. (2014). A new technique using fibrin glue in the management of auricular hematoma. Clinical Journal of Sport Medicine, 24(6), e65-e67.
Krogmann RJ, King KC. Auricular Hematoma. In: StatPearls. Treasure Island (FL): StatPearls Publishing; August 8, 2020.